Using Column ID Tags with ChemStation
-
In the Method and Run Control view of the Agilent OpenLAB CDS ChemStation Edition, select Columns from the Instrument menu.
The Edit Columns dialog box is displayed.
If the Edit Columns table is empty, go straight to Step 3.

Figure: The ChemStation Edit Columns table -
Select a line in the table that contains column information as close as possible to the column you are adding. The selected line acts as a template for the new column.
NOTE
Column catalogs are available only in OpenLab CDS ChemStation Edition C.01.07 SR2 and above with drivers A.02.14 and above. Click the Catalog button to display a dialog box that allows you to choose how to load the catalog into the table.
-
Click the Insert button to insert a line above the currently selected line, or the Append button to add a line to the end of the table.
The new line contains a copy of the information in the template line.
-
Click the Edit button to display a dialog box that allows you to edit the column-specific information such as Serial Number, Batch Number and Description.
-
Add or edit the other column-specific information (for example, maximum pressure, maximum temperature, length, diameter, particle size) in the Edit Columns table.
-
If the column is installed and will be used in the Multicolumn Thermostat, select YES in the Installed column.
-
Click the Plumbing button.
The Column Assignment dialog box is displayed.
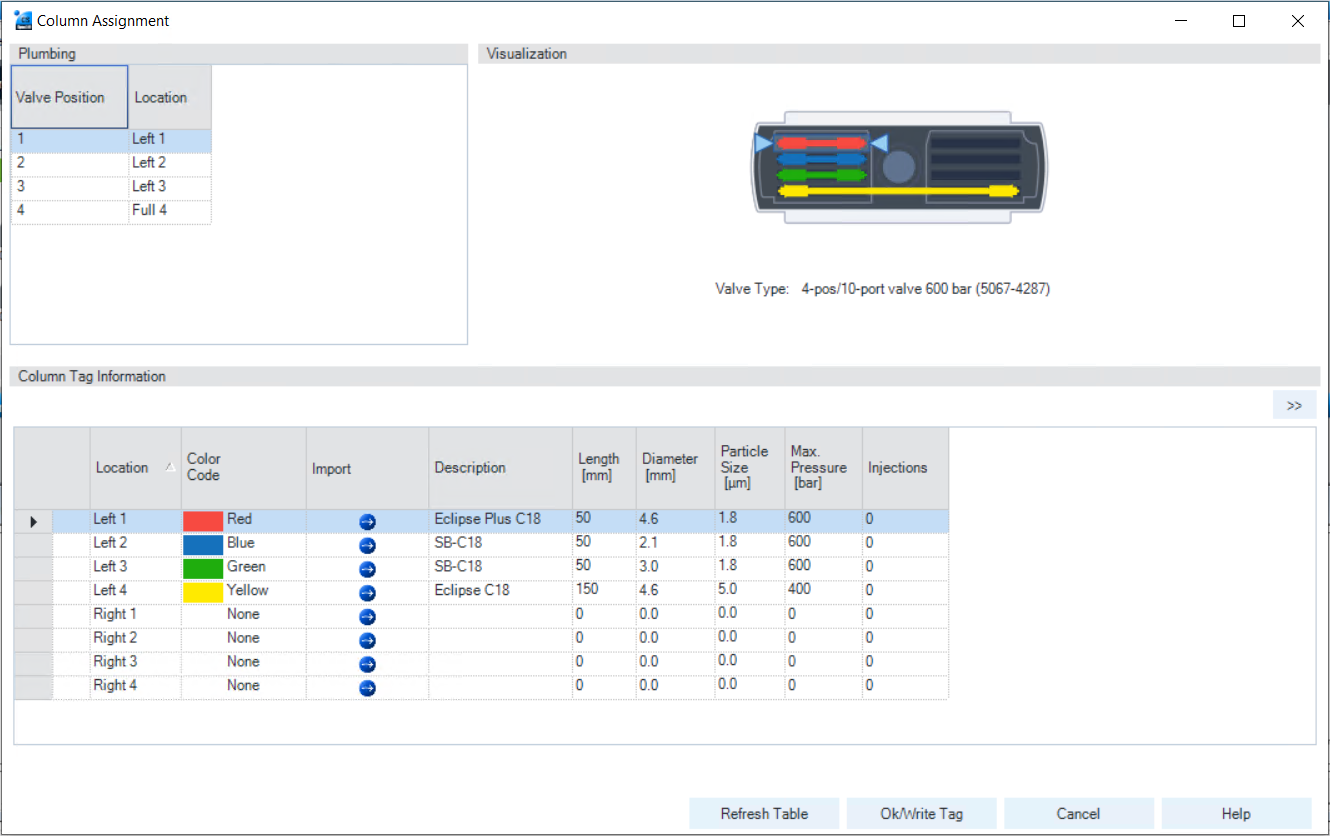
Figure: Column Assignment dialog box The Column Assignment dialog box allows you to specify and review detailed information about the columns attached to each position in the column compartment. The information in the Column Assignment dialog box is in three sections:
The Plumbing section contains a table where you can specify the plumbing assignment for each valve position.
The Visualization section gives a visual representation of the Multicolumn Thermostat configuration.
The Column Tag Information table shows the information stored on the column tag(s) of the installed column(s). For more details, see The Column Tag Information Table.
Click
 in the Import column of an empty line in the Column Tag Information table.
The list of columns from the ChemStation's Edit Columns table is displayed.
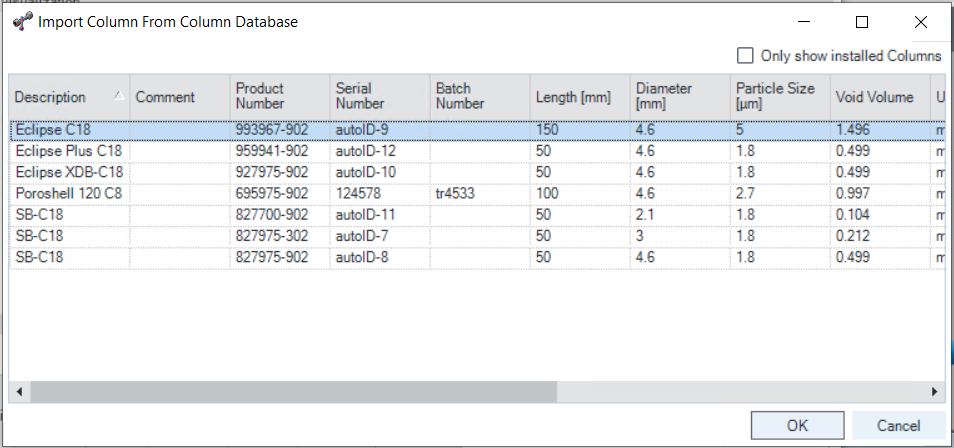
Figure: The list of columns from the ChemStation's Edit Columns table To reduce the list to only those columns that are marked as Installed, mark the Only show installed Columns check box.
-
Select the column information to import from the list of columns and click OK.
The column information is imported into the Column Tag Information table.
NOTE
It may take several seconds before the information appears in the Column Tag Information table.
NOTE
The characters semicolon (;), single quote (') and double quote (") are invalid for the Column Tag Information table. If these characters are used in any field of the table, an error is displayed, and OK/Write Tag button is disabled. You must delete all invalid characters before you can write the data to the tag.
The Description and Comment fields are limited to 32 characters in the Column Tag Information table.
NOTE
At this stage, you can assign a color to the column using the drop-down list in the Color Code column; this information is displayed in the Visualization panel, but is not written to the tag.
-
Click the >> button at the top right of the Column Tag Information table to show the hidden table columns. Use the horizontal scroll bar to access the columns at the right of the table.
-
If all the information for the column is correct, click the Ok/Write Tag button to write the information to the column ID tag.
The information in the ChemStation's Edit Columns table is also updated.
-
You can edit the information on the column ID tag using the ChemStation Edit Columns table. When you have finished editing the information, repeat steps 7 to 9 to update the information in the tag.
When you are sure that you will not make any more changes to the information in the tag, you can irrevocably seal the tag to set all static fields to read-only. Right-click in the appropriate line in the Column Tag Information table and select Seal Column Tag from the context menu.
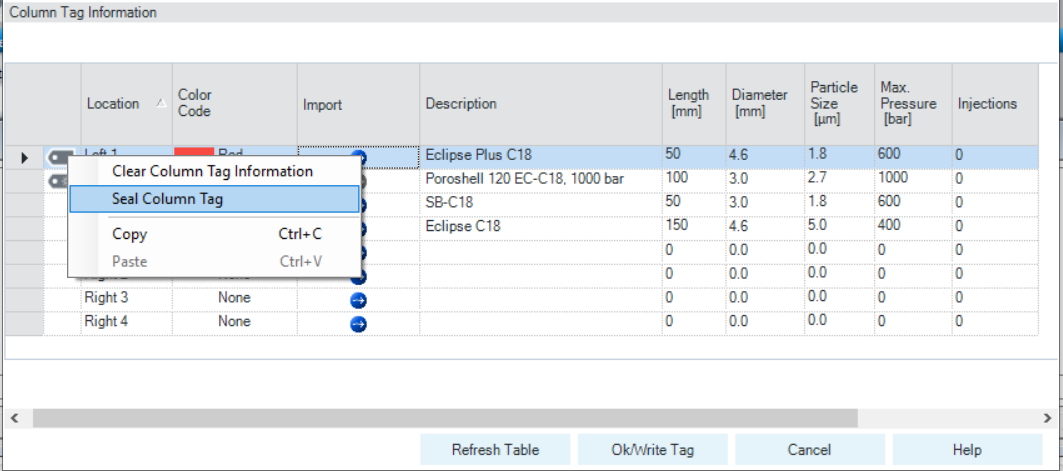
Figure: The Column Tag Information table context menu NOTE
Once a column ID tag has been sealed, the static fields cannot be edited.
Until the column ID tag has been sealed, you can delete all information in static fields on the tag using the Clear Column Tag Information command from the context menu.
The sealed column is shown in the Column Tag Information table with the
 icon at the beginning of the row. In the Edit Columns table of the ChemStation, it is shown with Sealed in the Tag column.
The Plumbing button of the ChemStation Edit Columns table displays the Column Assignment dialog box. It can also be displayed by selecting Column Assignment from the context menu of the column compartment Dashboard panel in the ChemStation's Method and Control view.
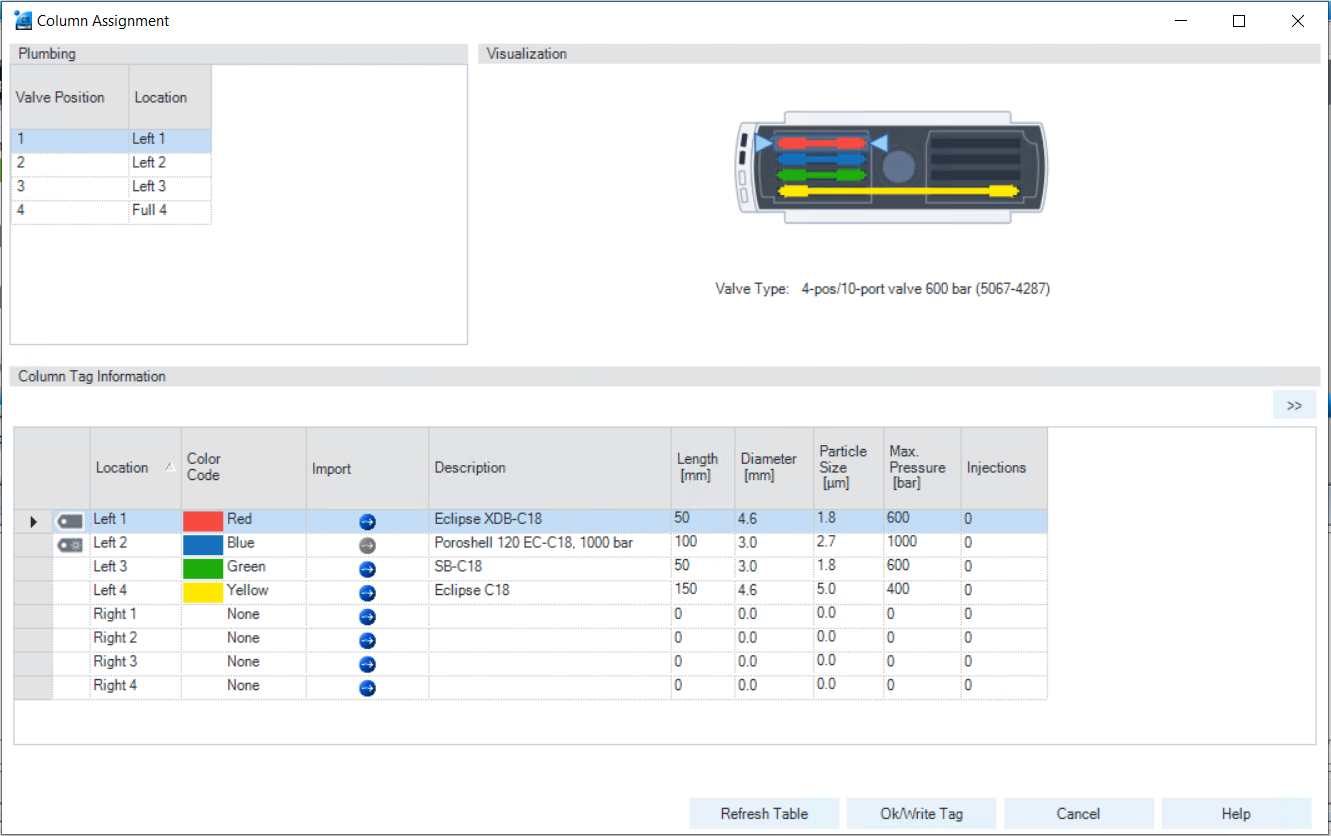
Figure: Column Assignment dialog box overview The Column Assignment dialog box has three sections that give you information about the column:
The Plumbing section shows the valve connections to the positions in the column compartment.
NOTE
Make the connections to give the shortest distances between the valve ports and the columns, and use a logical order (left column 1 to port 1-1', left column 2 to port 2-2' and so on). Avoid leaving unused ports between used ones.
The Visualization section gives a visual representation of the configuration of the columns in the column compartment; the columns are color coded.
Place the mouse cursor over a column to display a tooltip of the column information from the column ID tag.
Click a column to highlight the column information in the Column Tag Information table.
The Column Tag Information shows the information in the column ID tags for all columns in the configuration, including their location in the column compartment and their color codes.
The column compartment panel of the Dashboard in the ChemStation's Method and Control view also allows you a quick view of the column ID tag information.
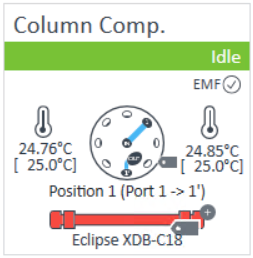
Figure: The dashboard panel of the column compartment Place the mouse cursor over the column ID tag icon (
 ); the tooltip shows the information currently stored on the column ID tag.
The column ID tag icon changes according to its state as described in The Column Tag Information Table.
base-id: 3001869195
id: 3001869195-2